Hello again!
In a previous article we looked into cloth simulations. This time we’ll learn how to set up liquid simulations that can help create a more realistic and dynamic visualization, especially when dealing with animated shots.

We’ll start with a simple simulation, and learn the basic settings, how to set it up, how to render it or export it. In a future article we may dive into more complex setups.
Here you can see the simulation we’ll work on:
If you’re interested in a bit of history and science about fluid simulations there is a great article on fxguide.com. We won’t need all that knowledge right now, but it’s always fascinating to learn where all these tools come from.
Introduction
The simulation of running water from a faucet is quite simple, but before setting it up, let’s look at how liquid simulations work.
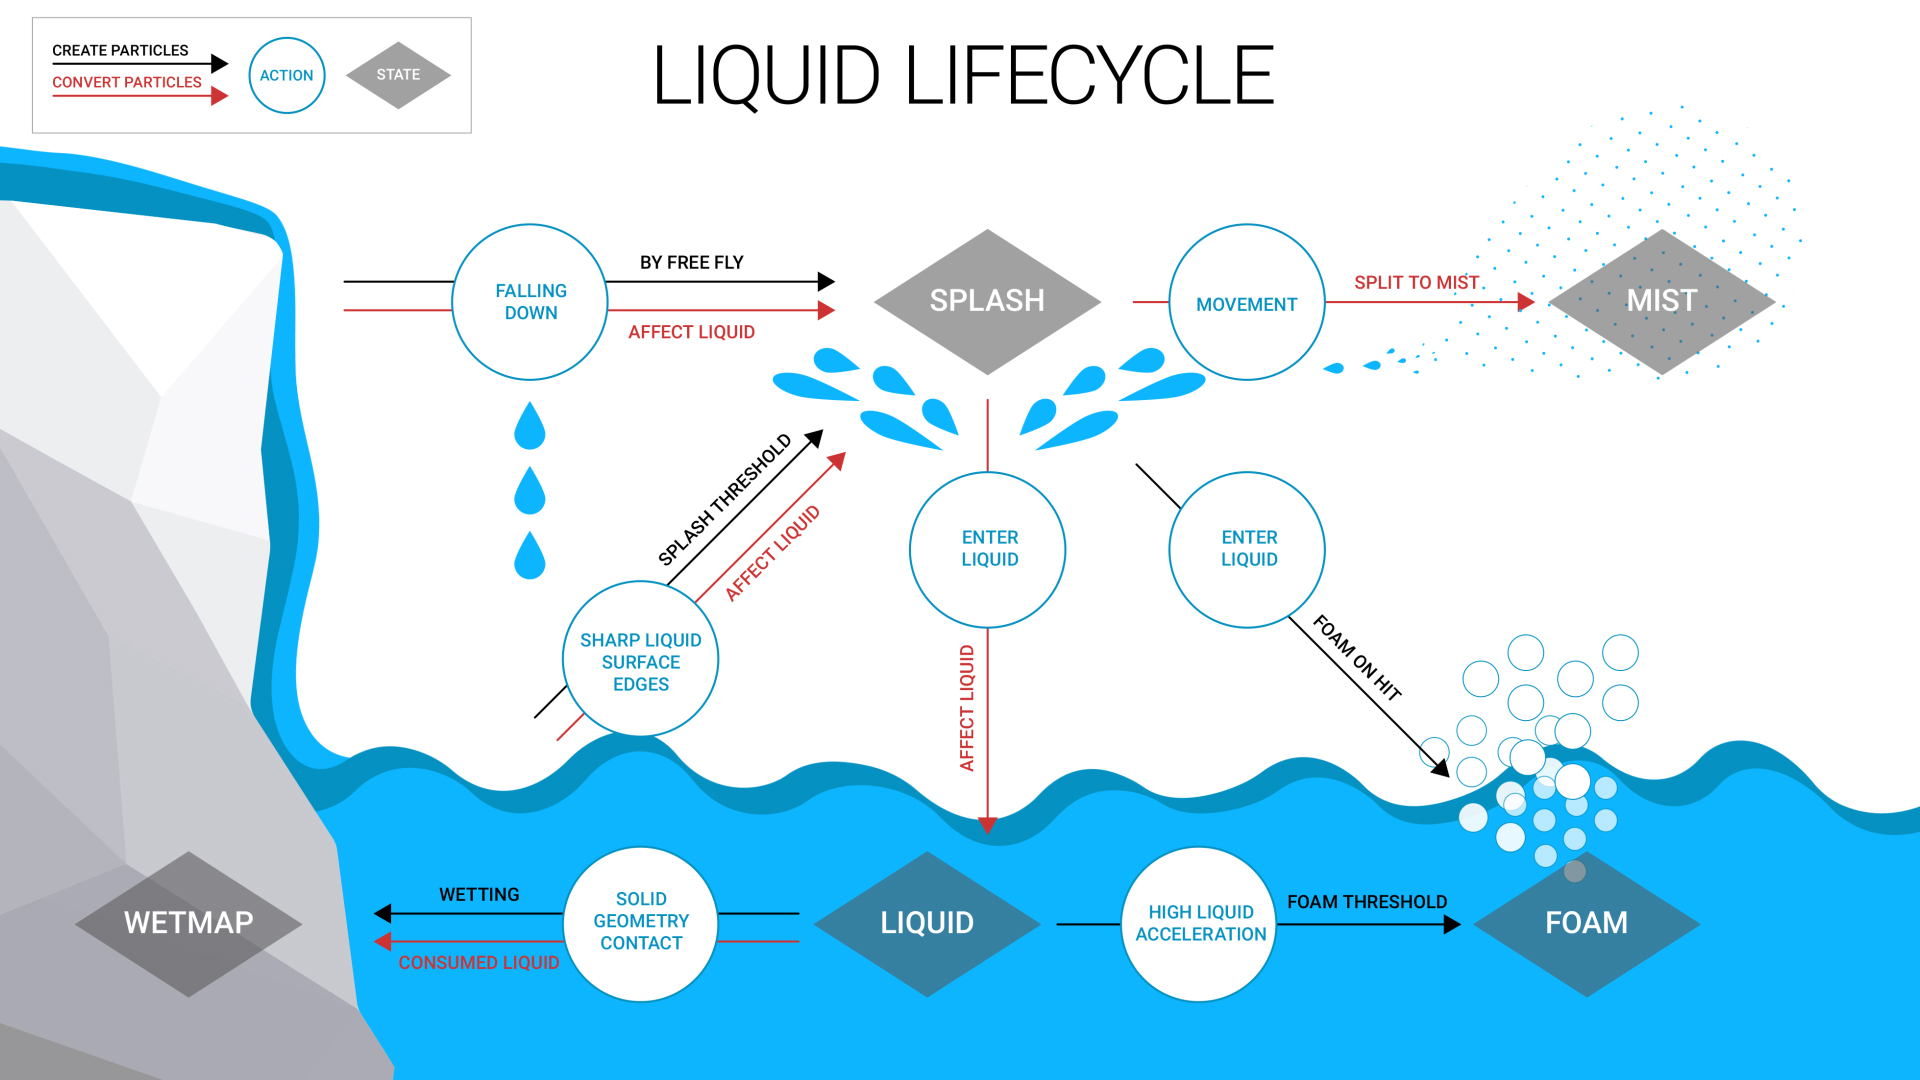
There is a really cool and well made infographic on the Chaos Docs website that explains the different interactions of a fluid simulation:

As you can see, each “effect” is generated from a specific interaction. So for example you would get a Splash only if the liquid hits a surface or another liquid. We’ll talk more about these concepts when we need them in our simulation.
Setting up the simulation
For the simulation we need a few objects: the geometry for the collisions (in this case the sink), the geometry that emits the liquid, the PhoenixFD Liquid Simulator and the PhoenixFD Liquid Source.
The PhoenixFD Liquid Simulator is where we can control all the parameters of the simulation: the quality, the interactions, and so on.
The PhoenixFD Liquid Source specifies the mesh used as a source for the liquid and a few other parameters.
I already have all the geometries, so I’ve exported what I need in an empty project to work on the simulations in a separate file.
Once the scene is ready, let’s add the PhoenixFD Liquid Simulator from the Create panel – Geometry section – select PhoenixFD in the dropdown menu and click on the LiquidSim button; then click and drag in the scene to create a box. This box is the area where the simulation will be computed, so make sure that everything that affects the simulation is inside it.
Now, to add the PhoenixFD Liquid Source, from the Create panel, in the Helpers section, select PhoenixFD in the dropdown menu, and click on the LiquidSrc button, then just click in the scene to add the icon. On this object link the mesh you want to use as a source for the liquid, in my case is the little circle inside the faucet.
It’s time to launch our first simulation.
Set the timeline with the length you want. I’m planning on rendering an animation with a framerate of 30 fps, so I’ll use a multiple of 30. In this case I’ll set 300 frames for the length.
Before starting the simulation there are two important steps to do: set a velocity value for the liquid source (or nothing will happen), and set a directory for the Cache.
Velocity settings
Select the LiquidSrc001 and set a value for the Outgoing Velocity parameter. For a common faucet the velocity should be between 1 and 1.5 m/s (inside the pipe), so we can keep a value of 0.7 m/s (70 cm/s) to simulate a faucet not completely open.
Let’s do something fancier with the velocity. Instead of keeping it constant value, choose a frame range and animate the velocity, to simulate the faucet opening and closing. My timeline is 300 frames, so I’m first setting the velocity to 0 by default, then from frame 15 to 30 the velocity will go from 0 cm/s to 70 cm/s, to simulate the faucet opening. From frame 205 to 225 the velocity will go from 70 cm/s to 0 cm/s, to simulate the faucet closing.
Cache settings
The Cache directory can be set in the Output tab of the PhoenixFDLiquid001 object, under the Simulation Cache Save Path. Click on the three dots, then Browse and choose the path you want.
Caching the simulation is quite useful because it saves the data on a disk instead of keeping it on RAM.
First Simulation
We can launch our first simulation. I’ll leave the other settings by default and we’ll look at them later.
You can do it from the Start button in the PhoenixFD Toolbar, or from the Simulation tab in the PhoenixFDLiquid object. It should take just a few seconds.
This first simulation is definitely quite bad because we need to work on the quality settings. There are two main controls for that: the Cell Size value under the Grid tab, and the Steps Per Frame value under the Dynamics tab.
Increasing the quality of the simulation will increase the computation time as well, so it’s better to change these values gradually to reach a good compromise between quality and speed.
For now, let’s increase the quality a bit. For the Cell Size I’ll lower the values in order to reach 1 million for the Total Cells, and set a value of 3 for the Steps Per Frame. It won’t look great but we’ll get a slightly better idea of the simulation.
Before moving on, I’m going to launch a simulation with higher quality settings, leaving the other parameters by default. In this way, we can better understand if the values we are using right now are ok, or if we need to change something.
For this example I’m using 100 millions Total Cells and 15 Steps Per Frame. After the simulation I’ve also rendered a sequence with simple materials to get a better idea.
Improving the simulation
Let’s now look at some other parameters that we can tweak, to get a more realistic result.
The effects that we need to replicate are:
- water flow noise
- surface tension for the water
- the wetting effect of the water hitting the concrete.
1. Flow Noise
To introduce a little bit of noise to the water flow, select the LiquidSrc001 and increase the Noise value.
Don’t go too crazy with this. We are simulating tap water, and usually the flow is fairly stable, so I’ll use a value of 0.02.
2. Surface tension
Surface tension is a physical property of liquids, and for water is around 72 mN/m (millinewton per meter). It also depends on the liquid temperature, but that’s not important for us.
To control this value in PhoenixFD select the PhoenixFDLiquid object, and in the Dynamics section change the Strength value in the Surface Tension area. It’s not specified which is the unit of measure of this parameter, so you’ll need a bit of trial and error. A value of 0.5 seemed fine for what I wanted.
The effect won’t be extremely visible. Also consider that this is not a software for CFD (Computational Fluid Dynamics), so there are some simplifications done during the calculation. The size of the scene can also affect the result.
If you are interested in the research in the field of computer graphics, here is an interesting paper about fluid simulations that will be presented at Siggraph 2021:
Solid-Fluid Interaction with Surface-Tension-Dominant Contact.
3. Wetting effect
The wetting effect is generated when the water hits the surface of the sink bowl and the concrete becomes wet.
There are two things to set up to make it work. First, in the PhoenixFDLiquid under Dynamics enable the Wetting checkbox. This option will generate a map, called WetMap, that is used as a mask in a layered material. To add a bit of realism we can slightly increase the Consumed Liquid value, 0.08 in my case, to give the impression of the water being absorbed by the concrete.
The Drying Time is to emulate the surface getting dry, I’ve set 8 seconds, but for a short animation may not be noticeable. You can also play a bit with Sticky Liquid to make some water particles stick to the surface, instead of slide away immediately.
Once these settings have been set up, we need to create two materials, one for the dry surface, and one for the wet surface.
Open the material editor.
I’m working with Corona Renderer 7, so I’ll create two CoronaPyhisicalMtl shaders, and for the wet version I’m simply darkening the Base Color and decreasing the Roughness amount. Then, create a CoronaLayeredMtl and connect the dry material to the Base material input, and the wet material to the Layer 1 input.
The WetMap generated by PhoenixFD goes to the Mask 1 input. To get the WetMap we need the node PhoenixFDParticleTex, which you can find under Maps > PhoenixFD. Connect it to the Mask 1 input, and link the Source Particle System by clicking on the None button, then select the PhoenixFDLiquid object. If it asks what you want to connect with, select the option WetMap.
After you launch the simulation you can see the preview of the WetMap as with red particles.
Exporting and saving the simulation
Until now we worked on a separate scene, with only the sink bowl and the faucet meshes. To send the simulation from this scene to the final one we have different choices.
The easiest one is to use the Cache files generated by the simulation. So, in the final scene, create a new PhoenixFDLiquid, you can rename it to something like PhoenixFDLiquiq_ReadSim, so we know it is just to read the simulation, and not to create a new one. The size of the Grid is not important, it will automatically reset once we link the Cache. But make sure the height of the PhoenixFD object is the correct one, or the simulation may go inside the mesh. Then, under Output we can set the path of the Cache, as we did before, or we can set the same path under Input, in the option Preview & Render Cache Path. You see that by default the Input path is set to the same one as the Output. Now, when we press Play on the timeline we should see the preview of the simulation in the viewport, as well as for the rendering.
Remember that since we are using the original Cache files, with the .aur extension, they can only be read by a PhoenixFD object. You cannot open them in other packages that don’t have PhoenixFD installed.
The other option is to export the simulation as a different file format, like .vdb (OpenVDB) or .abc (Alembic). This allows you to open it in every software with support for OpenVDB or Alembic, so basically most of the packages for 3D applications.
The export as OpendVDB is quite easy, since you can do it through the cache files. When you set the path for the cache you can select either the .aur or .vdb extensions. If you need to export as an Alembic format you can do it by first setting the Export as Mesh in the Export tab of the PhoenixFDLiquid object, then you can use the built-in alembic exporter of 3ds Max.
There are a few gotchas when exporting with alembic, so I’ll leave you the link to the documentation in case you need to do it.
In most cases it’s easier to keep the cache files.
Settings for final quality
We can now launch the final simulation.
The two settings I need to change are the Grid Cell Size and the Steps Per Frame.
For this simulation I lowered the Cell Size value to reach 100 million total cells, and set 15 in Steps Per Frame.
After the simulation it’s possible that the mesh used to render the liquid still presents some jagged edges. You can avoid this problem by increasing the Smoothness value under the Rendering tab. A value of 1 or 2 should be enough.
Here you can see the final animation.
I’ve also enabled the Motion Blur in the Corona Camera to get a more realistic result.


Rendering
A few words about rendering.
The still images were rendered with the simulation and the rest of the scene together.
The animation, on the other end, was rendered in two separate steps: one rendering for the simulation and one for the rest of the scene. Then everything was put together in compositing, with DaVinci Resolve. The reason is that the rendering of the refractive material of the water was taking too much if kept in the full scene. By rendering it in a simplified version of the original scene the render times went from 5/6 hours per frame to 10 minutes per frame.
We’ll definitely explore more simulations with PhoenixFD in future articles, so stay tuned!
And, as always, feel free to share your experiments with us!
Finally, I want to say thanks to my dear friend Dario for helping me solve some problems with the simulation.
See you in the next article! Bye!
Enrico

